Showing posts with label Windows. Show all posts
hack windows 7 admin password

Hello Friends..! Today in this post I am gonna tell you different methods on how to Hack Windows 7 admin Password. We all know that windows 7 has higher security features with many advantages over Windows XP. Here in this post I am going to tell you two methods of Hacking Windows 7 admin Password.

Note - This Post is for Educational Purpose only. Many a times we forget our password, so using this methods you can recover your password.

Using Windows 7 Start-Up Repair :-

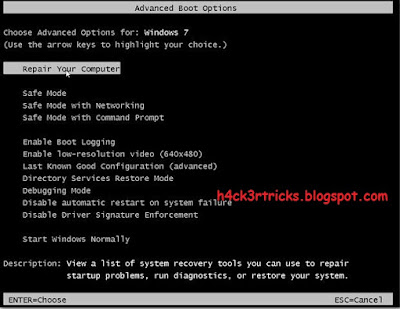
1. Turn on your PC which has Windows 7 installed. Tap F8 continuously on the boot screen to get the Windows Start-Up options.
hack windows 7 admin password

2. Now here comes the tricky part. You have to Enter into Windows 7 Start-Up Repair. So choose "Start windows normally" option and then immediately turn off the Power Source. In case of Laptops remove the Battery and in case of Desktop turn off the UPS or Power Button. Then turn on the PC again, wait for it to load. After that you will be prompted with two options in the boot screen, select the first option - "Launch Start-up Repair (Recommended)". Wait for it to load completely and scan for issues.

hack windows 7 admin password

hack windows 7 admin password

3. After 5 min, It will ask you to "Restore Defaults", select 'Cancel' option and let it continue.

hack windows 7 admin password

hack windows 7 admin password

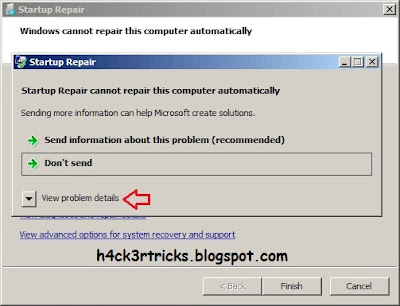
4. Now just wait for about 10-15 minutes ( time depends upon the performance of PC ). Now this is where the another tricky part comes. After about 15 minutes, an error report screen will pop-up asking you to send information or not. Click on "View Problem Details", scroll down to the bottom, Find a link stating like X:\windows\system 32\ .... and click on it.
hack windows 7 admin password

hack windows 7 admin password

5. An another Window will pop-up that looks like a notepad ( It is actually a notepad ). Click on the File Menu in the Menu Bar, then select Open. Navigate to C: Drive ( or the drive on which Windows 7 is installed ) => Windows => System32, after that change the "File Type" to 'All Files'.

6. Search for a file named "sethc.exe" ( this file is the shortcut to shortcut and sticky keys ), rename it to something else like abc, xyz etc. Search for cmd.exe, make its copy and rename the copy as 'sethc.exe'. Now it's almost done.

7. Restart the PC, On the Log In screen press Shift 5 times, until cmd opens. 

hack windows 7 admin password

8. Type "net user administrator /active:yes", this will activate the default administrator account of the PC. Change/delete/manage/reset passwords from there.

9. You can also directly change passwords from cmd, type "net user (admin/admin account name) *"


Enjoy....!!


Don't forget to subscribe to my blog for further updates..! Just click the Message Button on the below left corner of your screen and enter your e-mail and click SIGN UP :-)


If you face any problems then you can leave a comment below....we will get back to you as soon as possible. :-) :-)

how to bypass fortiguard

Hello Friends….!! Welcome..! By using the below method you can Bypass any WEB FILTER in schools, colleges or offices.

VPN Type: PPTP VPN
VPN Auth: Auto (Enabled)
VPN Server: euro217.vpnbook.com
                          euro214.vpnbook.com
                          us1.vpnbook.com (US VPN - optimized for fast web surfing; no p2p downloading)
                          ca1.vpnbook.com (Canada VPN - optimized for fast web surfing; no p2p downloading) 
VPN Username: vpnbook
VPN Password : See Password Here

Following are the method to configure PPtP VPN in different OS :-

Configure Free PPTP VPN in Linux Ubuntu

1. Open Network Manager – From the desktop click on the Network Manager icon in the top right hand corner, click on VPN Connections and Configure VPN. If you can’t see the Network Manager icon, you can open network manager by clicking on System -> Preferences -> Network Configuration and then click on the VPN tab.
2. Add VPN connection – When the VPN Connection window is displayed, click on Add to create the new connection.
3. Choose the connection type – Ensure the connection type is PPTP and click Create.
4. Enter VPN Account Details – For gateway enter the VPN server name provided above. In the Connection name field, enter “VPN Connection” as the new connection name. Enter VPN username and Password as provided above.
5. Advanced Settings – Select both MSCHAP and MSCHAPv2 options. Check the box labeled Use Point to Point encryption (MPPE) and then click OK. Click OK again to save the VPN connection.
6. Connect to the VPN – Now start the VPN connection by clicking on the Network Manager Icon again, select VPN Connections and click on the new connection you have created.
7. You’re connected....!! – The Network Manager icon should now have a little padlock icon on it to indicate that the VPN is now connected.

Configure Free PPTP VPN in Windows XP

1. From Windows XP desktop, click Start – Control Panel to open the control panel.
2. Click Network Connections icon, open the Network Connections window.
3. Click Next button to get the first “New Connection Wizard” Welcome window.
4. Select “Connect to the network at my workspace” in “Network Connection Type” window, click Next.
5. Select “Virtual Private Network Connection” in “Network Connection” window, click Next.
6. Enter VPN Connection as the VPN connection name, click Next.
7. Enter VPN Server as provided above and click Next.
8. Click “Finish” button.
9. Now the VPN login window shows up, use the above Username and Password and click “Connect” button to start your free Win XP VPN connection....!!

Configure PPTP VPN in Windows 7

1. From Windows 7 Desktop, click Start – Control Panel to open the Control Panel.
2. Click Network and Internet.
3. Click Network and Sharing Center.
4. Click Set up a new connection or network, then Connect to a workplace.
5. Select option “No, create a new cnonection”, then “Use my Internet connection (VPN)”.
6. In the Connect to a workplace window, fill VPN Server hostname as provided above.
7. In Next window, use Username and Password as provided above.
8. Click “Connect” button to start the free VPN connection in your Windows 7 Desktop.

Configure Free PPTP VPN in Windows 8

1. Click on “Open Network and Sharing Center” from the network icon from the taskbar or click on “Network and Sharing center” from Control Panel.
2. Click on “Set up a new connection or network”.
3. Select “Connect to a workplace” and click “Next”.
4. Choose “Use my Internet Connection (VPN)”.
5. In the “Internet Address” field use the above provided server as hostname. In the “Destination name” field type “VPN Connection” then click “Create”.
6. Click on the monitor icon on the bottom right-hand corner.
7. Right–click on the “VPN Connection” connection, and choose “Properties” from the menu.
8. Select “Security” tab and for “Type of VPN” select “Point to Point Tunneling Protocol (PPTP)” and click “OK”.
9. Click again on the monitor icon on the bottom right-hand corner, and click “Connect” to “VPN Connection”.
10. In the next fields type VPN username and VPN password as provided above and click “OK”.
11. When next to “VPN Connection” is written “Connected” your connection has been created.

Configure Free PPTP VPN in Mac OS X

1. From Mac OS X 10.x (Tiger, Leopard, Snow Leopard, Lion or Mountain Lion), click Top Left Apple Icon, then click “System Preferences…” menu item, in opened Window, click “Network” icon.
2. In opened Network window, Click on the ‘+’ button at bottom left corner, in the next opened window, input the following, then click “Create” button:
Interface: VPN
VPN Type: PPTP
Service Name: VPN Connection
3. In the next window, enter the VPN Server information as provided above, use Automatic ( 128 bit or 40 bit ) for Encryption, then click Apply button.
5. Click the Advanced button and under the Options tab make sure to check Send all traffic over VPN Connection option, click OK button, click Apply button again.
6. Now click Connect button in the middle of the window, from the Internet Connect window, use the above provided VPN Username in the name field, and use the password given above, click “OK” button to start your free VPN connection in your Mac OS X desktop....!!


Enjoy....!!


Note - This post is just for educational purpose.


Don't forget to subscribe to my blog for further updates..! Just click the Message Button on the below left corner of your screen and enter your e-mail and click SIGN UP :-)


If you face any problems then you can leave a comment below....we will get back to you as soon as possible. :-) :-)

how to remove shortcut virus

Hello friends….welcome back with a new post on how to remove “SHORTCUT VIRUS”. Are you affected from “SHORTCUT VIRUS” PC or PenDrive and you are unable to remove them..?? But now don’t worry. In This Post I’m going to tell you how to remove the “SHORTCUT VIRUS” completely from any PC or PenDrive….


Actually this problem occurs due to transfer of data from one system to another system when one of the system is affected from SHORTCUT VIRUS and you are transferring the data from the infected system to your system. And this type of problem also occurs due to download of an infected file. If once your PC or PenDrive infected from shortcut virus then it’s not easy to remove them since some free version AntiVirus ( like AVG, Avast, Avira, etc. ) are also unable to delete the “SHORTCUT VIRUS” completely from a system. But now you can remove the “SHORTCUT VIRUS” from your PC or PenDrive by following the below method by using the necessary tools and command. I am sure that this method will work 100% and your system will be free from “SHORTCUT VIRUS”..!!

METHOD :-

1.Firstly download USB Virus Remover ( v2.1.5 ) from the below Dropbox Link....


DOWNLOAD HELP HERE                        DOWNLOAD BOTH ( Application + Help)

2.Plug infected USB device ( if you want to remove from PenDrive ) and Run the USB Virus Remover ( v2.1.7.5 )  application and click on Launch Virus Remover. 


3. After clicking Launch Virus Remover in two windows will be open, close the black window and Enter the drive letter. Ex. My Drive name is H4K3R(I:) so simply enter I and press enter.


Wait for few seconds so that you can see the content of your PenDrive ( shown in screenshot below ) so that you can select the required operation for the next step.


4. After 7 seconds a new window will be open and you wil be given 7 Options as shown in the screenshot below....


Enter the number of the option on which you want to proceed or the action which is required. All the options and their work are explained below :-


DETAILS OF THE OPERATION OF ALL THE OPTIONS :-

1. Skip deletion of exe files,
It skpis the deletion of the .exe files ( make sure you don’t have any .exe virus and proceed to exit point ).

2. Rename all exe in root to exe_virus and delete_later, manually (not_recommended, if infected with exe virus use option 3)
It skpis the deletion of the .exe files ( make sure you don’t have any .exe virus and proceed to exit point ). option renames all .exe to .exe_virus but only in root of drive so that you can delete them by selecting the virus or infected files.
Eg: If your drive conatins these files :-
            I:\Setup.exe            &         I:\setup\Setup.exe
            In this scenario only I:\Setup.exe will be renamed to .exe_virus. So make sure you have virus only in root drive.

3. Delete exe files, by Choosing which to delete
Delete .exe files one by one. This step is a very complex, but there are no choices when its infected with .exe virus ,so it will ask you which .exe file to delete. So delete unknown files by pressing Y or y else you can press N or n to leave deletion of that file.

4. Remove regsvr.exe virus startup
If you are infected with ‘regsvr.exe’ virus then you won’t be able to access the registry editor, it will say registry editor is disabled by Administrator. So for this, use this tool to remove virus then reboot your PC and then use this option to delete 'regsvr.exe' virus startup.

5. Remove All virus startup (recommended if already infected with file and folder shortcut creating virus and with cmd,taskmanager,regedit killer)
Removes all startup virus like File & Folder Shortcut creating virus, cmd, regedit, taskmanger, etc.. Close and kill virus and the process before it operates or starts. So you will have to be fast to click merge registery. ( Not needed if viruses are removed. But still to be safe, use this option.)

6. Check for updates (Both GUI and CMD vs) or Submit virus unknown to app in .zip/.7z file via comment
You can use this option to check for updates, of the software. You can also submit me unknown or new viruses in .zip/.7z. by commenting in a post

7. Donate/Send me Beer, will help a lot. You can donate any amount you wish :)

Donate any amount if you are satisfied with our software :-) this could help us a lot.

5. After entering the option number some windows will open and close continuously for few seconds and then a window will open as shown below….


After all the processes has been completed you can check your PC or PenDrive from where all the “SHORTCUT VIRUSES” has been removed….!!

Enjoy..!!


If you face any problems then you can leave a comment below....we will get back to you as soon as possible.. :-) :-)